ATTENTION!
Handling venomous/poisonous animals is dangerous and should only be performed by licensed professionals.
Owning venomous snakes, reptiles, etc. might not be legal in your State/County/City. Please contact your local DNR for more information.
Transcript
what's up guys welcome back to yet another episode oh i'm so excited about this one so as you guys know i love vision cages i have a lot of them now a couple months ago vision cage reached out to me and asked me if i would like to be in a little well challenge of course i said yes and they introduced me to the nanovivarium challenge now this challenge was uh thought up by some of the guys over at vision cage to help promote obviously vision cage and also josh's frogs which is an amazing plant company uh they have lots of different animals and plants a lot of bioactive stuff that they help people build cages they have their own youtube channel and everything now they asked me if i would be interested in competing in a little friendly competition turning a vision cage model 215 into a little nano vivarium so here's that build okay so starting off with the cage you see here i am using a little t5 grow light now i want it to be straight i don't want it to be at a weird angle so once i figure out where i want it i then taking measuring tape and just mark i'm marking four inches down from the top of the cage with a little sharpie here gotta make this second one a little bit bigger so i can see it better but this way it'll be nice and straight and you can go ahead and start putting the mounting brackets on now these are the brackets that came with this light so it was pretty simple i had to do is kind of screw them through the plastic i've done this before not necessarily with grow light so i know it works see the screw popping out there we'll go back and take care of that here in a little bit but then you can go ahead and put the light on the mounting brackets itself once it sits on there you don't really have to worry about taking it off again so nice and straight perfect just the way i wanted it now going ahead and drilling the hole
for the power cord to go through if you guys have never seen me do before all i do is simply splice the cord to pass it through a little hole instead of drilling a bigger hole and having to fill it up later this makes it a lot easier i've done this in previous videos if you guys haven't checked it out definitely worth a look now for the screw all you got to do is simply cut it off with a pair of dikes or cutters and it's not really sharp after you cut it off as long as you cut it nice and flat now when it comes to most of my builds i usually kind of build them as i go this one i did plan out a little bit i wanted this one to look kind of like a fallen branch in a rain forest so taking a couple of cork rounds here one that i cut directly in half the other one is a nice big long bent one kind of placing them where i want to give it a final okay with a little bit of a branch kind of coming through here that's relatively what it's going to look like so taking my great stuff pond and stone going ahead and filling in this first cork round all the way around it those little pots you see or a little plastic you see at the bottom there that's just a net pot that i'm using to kind of hold it in place we will remove that here in a little bit so this cork round is hollow all the way through i wanted to make sure that no snakes can get into it so as you can see here i'm packing it full of uh sphagnum moss so this way you know no snakes can kind of slither and hide in there this is a very good thing to do because you want to be able to see the animals in your enclosure not hide all the time so just taking this and packing as much as i could in there it'll also hold humidity i do want to put a plant in this particular piece later in that hole right there so once you get that all nice and filled again using a net pot to kind of hold it still and just taking my great stuff foam and going around
both edges so once that's a little dry i'm coming over here with this bigger branch this solid branch now one thing that's nice about the vision cages versus a glass cage you can actually drill through them so i'm actually using a screw to hold this one in place you can do this with any of them or you don't have to if you don't want to but just kind of using that screw to hold it in place then going ahead and foaming the top now i know this looks weird because that's where the light is but i'm actually foaming the top lip and the lip all the way around this cage so that snakes don't hide up there that's one of the most frequent things with vision cages and i suggest you do this with all of your vision cages because it just makes a little easier now testing the light after you get it all wired up looks good you can tell it's the t5 grow light because it's got that pink hue to it but that's okay that's just for the plants [Music] now drilling a bigger hole in the bottom of the cage here i know it sounds crazy but i promise you there's a good reason for it so i'm taking a little bulkhead this is actually a missed king bulkhead that i'm putting through here now i'll explain to you guys here in a little bit why i am actually doing this so again this is the bottom of the cage where all the substrate and everything would be now this is a new thing i'm trying out here this is black silicone two normally i use silicone one uh always with the ge but i want to try this out in a new build just to
see the color difference basically the problem when you miss certain spots with the clear silicone it's uh it's let's just say it shows so with the black silicone i'm hoping it wouldn't show as much so go ahead and put a thick layer of this on kind of going to smooth it out just like previous builds and then add the substrate to that [Music] taking a little bit of uh orchid bark kind of spreading that around as well just to add a little bit more texture to the wall of the cage gonna be doing this all the way around the entire cage now taking the peat moss sprinkling it on not really sprinkling it i always put peat moss on very heavy it's always good to put it on heavy and you can just vacuum off the excess later packing that down making sure it sticks to the silicone very well so i used to do one side at a time let it dry for a couple hours then go ahead and continue on to the other side but you can do two sides as long as it doesn't touch you're not going to mess up the first side you did so you'll notice here when i start spreading this out there will be a little bit of a gap in between the two which you can go back later and do that little gap so just simply leaving that empty line there so it doesn't mess up that first silicone because it is still wet and just continuing the process
[Music] now coming over to the back side pretty much doing the same thing over again you want to make sure you cover all those walls really good so taking that black silicone just kind of going around the cork round there and start in the back corner
[Music] [Music] [Music] [Music] now why building this cage my awesome order of plants came in from josh's frogs i was really excited about this this is probably one of the biggest orders i've ever put in doesn't necessarily mean i am going to use all the plants for this cage but i am going to use a lot of these plants so just sitting here and you can see how well they package their plants so they are very well protected during shipping we got lots of moss lots of tropicals uh some different vines oh yeah and how could i possibly forget i got this big beautiful plant right here oh that thing's awesome that's definitely going in a future build but all the plants are individually wrapped wrapped in plastic the dirt is even taped down on these guys so that it doesn't spill out all over the place so these guys have been doing this for a very long time i'm very happy that they were part of this project
[Music] so now they have this little piece of plastic that you can get with the cages if you want to make them bioactive to raise the bedding but it takes away a lot of the cage and i didn't really like that so i did end up actually just taking that out and not using it now you see that big black circle there for the drain the reason why i did that is very simple now you're probably wondering why why i would do this it's really simple actually it's because well vision cage you can't really see through them you know unlike the other cages you normally build bioactive are made of glass so you can see the water level through the glass can't do that in vision cage okay so starting with the hydroton um in this particular build i went with the hydroton over the foam pads that i recently have been using only because well i didn't have any foam pads at the time and i didn't realize but piling up the hydroton which are little clay pedal wheels all the way to the back having it very very thin in the front so i can have a nice slope of substrate as well again because i didn't use that plastic barrier but you can kind of see here as i slowly move the camera over very thin almost one two maybe two pebbles thick in the front and then i have it pretty thick in the back now putting that drainage layer in uh this is going to help the substrate stay out of the hydroton simple weed block now my substrate is abg soil that i do
actually make myself i love this stuff i've been using it since i started using bioactive and i've never had a problem with plants they always thrive every time i put them in it now using this rock that i actually kind of found just in my yard i'm using it to kind of make a shelf or a difference in height from the front substrate to the back substrate so the back substrate i have very high versus the front substrate which is very low obviously i don't want it to go over the lip of the cage but i do like the way it looks so i left it in there now starting with a drill bit i'm actually drilling a hole in the cork bark here and also going to do one in the branch here now i personally like to do this for bromeliads i've seen other people just kind of stick them to things but i just like to drill a hole for them stick them in there see how they look and then once i feel i like the position of the plants then i go ahead and pull them out and add super glue now the super glue i do use is a super glue gel gorilla glue gel um it is plant and animal safe it does take a little bit longer to dry but uh it's again plant and animal safe so i can't complain about it now taking a little fern and sticking him in the back corner here uh still making sure he's getting a good amount of lights this particular firm does like a little bit more light than your average ferns now this vine i was very excited about um i wanted him to kind of creep up the back cork bark piece there and also the side wall i don't have this vine in any other cages so i wanted to kind of showcase this vine a bit now this plant here as you guys mostly know i don't know my plants all too well
but this one's like a chocolate something another vine i'm going to be putting on the other side wall i want to make sure this guy gets a lot of lights i know this particular one i do do my research on plants guys before i go ahead and start putting them in cages just so you know uh this is actually a type of moss planting this up in that hole kind of wanted to maybe grow down the cork bark piece it is a slow grower the fact that it is moss should let you know that already but i have this in a couple of other cages and it looks awesome once it starts growing in now taking a bit of mood moss and kind of planting this around the cage yes i have a tattoo of a rabbit on my hand it's not real i have a two-year-old [Music] now after everything's kind of in for the most part i'm just giving the cage a nice good soak down i want to spray all those plants make sure they stay nice and hydrated especially that new moss add in a bit of leaf litter just to get started here uh this is oak leaves i believe now there's two reasons for this one it makes the cage look a little bit more natural and two it's a food source for the springtails and isopods in the future now i like the way it's coming out but we are not done yet i think the mood moss is a nice little touch kind of growing out of little little spots i added some other moss as well that i found around my yard
uh you can kind of see that in some of the spots now i'm actually going with a reptifogger on this um not a misting system but i wanted it to be unlike anything that most people have seen before so i figured why not have it kind of look like a waterfall so i like to get creative with repty foggers because yes you can have it fill up a cage but this is a very small cage so it would fill up very quickly so what i'm actually doing is taking a pvc pipe here it actually fits right over the rupty fogger i believe it was quarter inch pvc taking another piece putting caps on it splitting it in half taking a t piece putting them back together and then drilling holes in the bottom of them about every inch or so apart so what i'm actually going to do is set this on the back vent piece making sure i get the right length for the down pipe and when you turn that on you have a cool little waterfall now with some adjusting it'll look a lot better but it looks really cool you have a little waterfall of fog now adding the isopods which i'm just using tropical white dwarf isopods for this build and on the other side of the cage i do like to spread them out at first i don't like to put them all in the same spot adding the springtails so these guys you
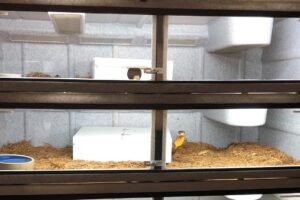
can see they float very very well so you can kind of just pour them in they look like little white fleas realistically you can kind of see them on the crop on the rock a little bit there so i did want to move this vine it does take a lot of light and it was in a very dark spot there so i did want to change that up so i ended up moving it to the other side so it gets full light all the time now adding a couple more leaves different types of leaves just to kind of add more color and then simply putting the glass in i'm really liking the way this cage came out for my first vision bioactive i'm pretty thrilled with it so now after about a month of the cage being set up everything is looking real sharp i absolutely love it the different colors in this cage really make it pop i actually ended up putting the blue insularis in here or the blue komodo pit viper in here great snake to have in here just to add a little bit more color the moss is starting to grow nice i'm really pleased with it i like the fog too it's a nice little touch all right guys so hopefully you enjoyed this build as much as i did it was so much fun making this again i've never done this in a vision cage until now um might have had the gears turn a little bit might do another one we'll see we'll see but we got to see what the future holds so hopefully you guys enjoyed it hopefully you learned something new remember subscribe if you're not already smash that like button if you haven't already and i will see you guys in the next video like always big thank you for watching big thank you to my patreons you guys are awesome i really appreciate you guys if you guys would like to become a patreon definitely check out the link in the description below and i will see you next time bye you